How I Rebuilt the Layout for Better Views, Structure, and Planting Space
When I realized that the most important view of my garden was from the patio, I knew the entire layout had to change.
This redesign centers on one idea: a strong, central lawn path, flanked by bordered beds and rose plantings, leading the eye into the heart of the garden. But getting there wasn’t simple — it involved design drafts, plastic edging frustrations, misaligned centers, and a whole lot of tilling.
Here’s how I redesigned my back garden and what I learned along the way.

Why I Changed the Garden Layout
From almost every occasion — watering, relaxing, having guests over — the garden is viewed from one spot: the patio. That view looks straight across to the opposite corner of the fence, the deepest visual point.
But my previous garden layout didn’t take that into account. There was no strong line, no path pulling the eye forward. So I set out to create a centered lawn path on a diagonal axis — something with structure, focus, and symmetry — with roses eventually lining either side and an arbor overhead.
Setting Up the New Pathway Layout

I started by referencing a drawing I’d made (version 3 or 4 by now — this has changed a few times!). Using stakes and string lines, I laid out the proposed path. I walked it, adjusted widths (starting at 12 feet, then shrinking to 8), and checked how much growing space I’d have left for vegetables on either side.
Originally, I wanted to border the path with bricks, but I shifted to plastic edging for simplicity. The challenge? Keeping that edging straight. It turns out, if you stake it firmly in every hole and pull it tight as you go — or even add stakes between the holes — you can get a surprisingly clean edge. I installed the edging in reverse, with stakes on the lawn side, since I planned to raise the lawn level later and cover them with soil.

Raising the Lawn and Creating Structure
To elevate the path, I top-dressed the existing grass with bagged garden soil. My goal was to make the lawn slightly higher than the beds and paths around it — I’ve always found that visually and practically better. I used the edging itself as a leveling guide, running the rake along it like a screed board.

This worked — for the most part — but then I hit my first real snag.
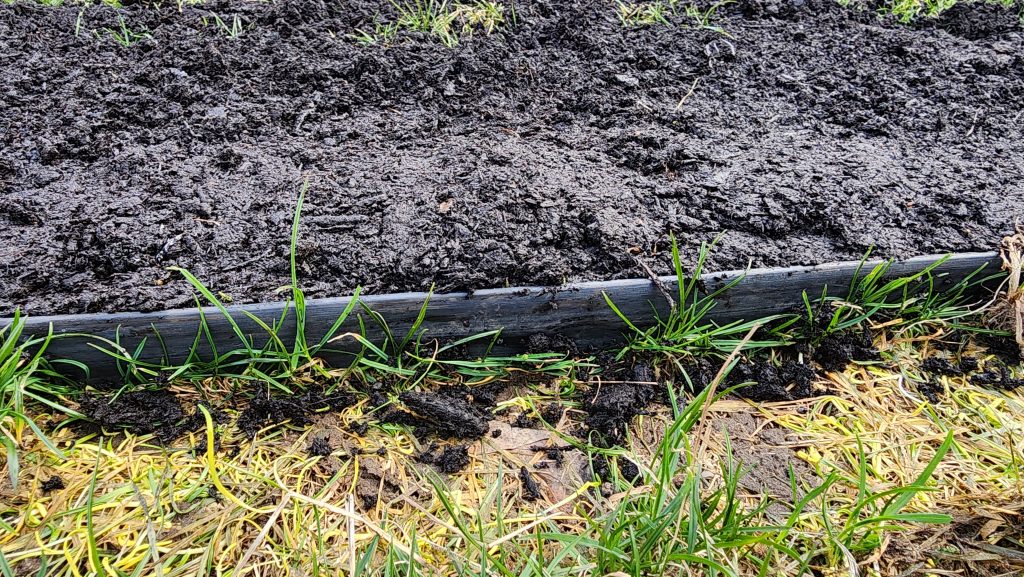
The Plastic Edging Problem
The plastic edging I used was only about 1½ inches tall. When I began digging the planting beds alongside the new lawn path, I realized the edging would do almost nothing to stop grass from creeping under it into the beds. Because there was no hardscape or concrete backing it, the edge was just floating in soil. That’s a weed invitation.
At the same time, I noticed an even bigger problem…
The Whole Path Was Off-Center
Looking at my drawing and comparing it to the string lines I had laid, I realized the centerline of the path was 2–3 feet too far to the right. The line should have aligned slightly left of the rear garden corner. This error meant the whole path had to move — not just for symmetry, but for the entire concept to work from the patio’s viewpoint.

So, I pulled up the plastic edging. And since I was redoing everything anyway, I decided to abandon the plastic altogether and try something else.
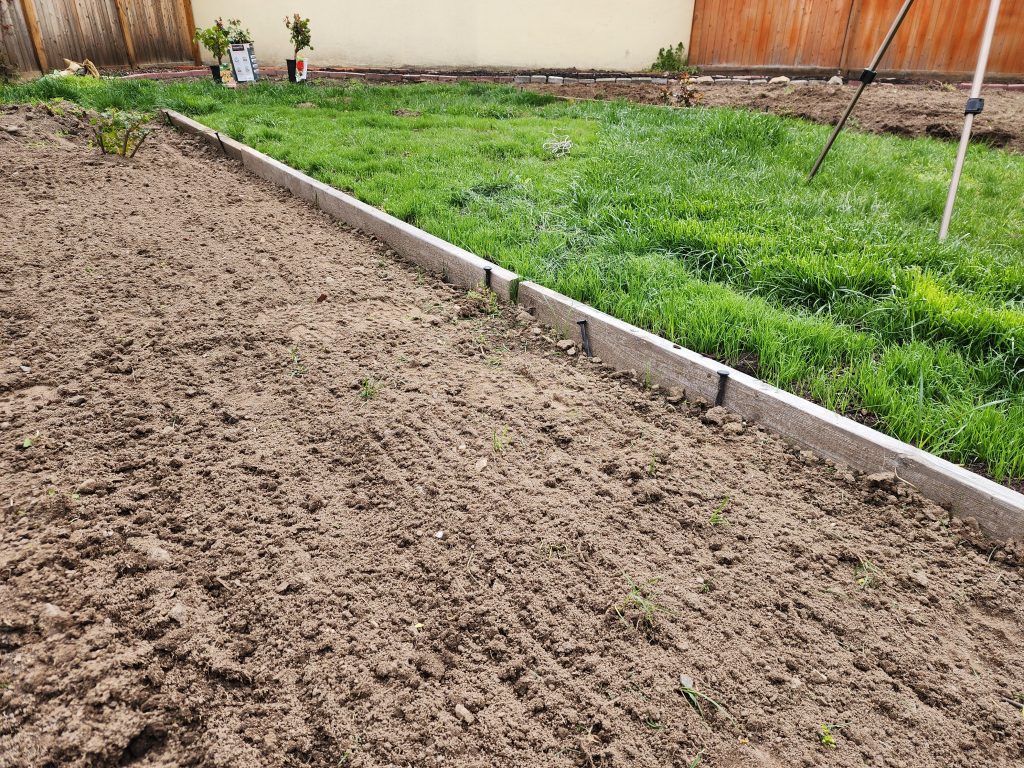
Switching to Wood and Re-Edging the Lawn
I had some long 2x4s that were perfect for temporary borders. Using a half-moon edger and a few of the plastic edging stakes to secure them, I re-established the new, properly aligned path. I added more soil, building it up almost like a raised bed.
From there, I sharpened the new right edge of the lawn with the edger, cutting a clean line. Everything to the right of that would become a new planting bed.


Tilling the Beds and Transplanting Grass
The grass to be removed was thick and well-rooted — so I brought in the tiller. I worked both sides of the new path in perpendicular passes. It took more than one session, but it worked.

Rather than toss good turf, I dug up healthy grass from the tilled areas and transplanted it into the center lawn strip. Bit by bit, the shape of the lawn path came together, curving slightly at the far end (toward the back corner), and pointing cleanly toward the patio.

Final Adjustments and First Plantings
I kept building up the soil in the center path, filled in with transplanted grass, and overseeded the area. Gradually, the lawn started to green in. The view from the patio transformed — now anchored by a structured, green corridor leading the eye outward.
I’ve already started planting roses along the path’s edges and plan to install a simple wooden arbor made from 8-foot 4×4 posts to create an overhead focal point.

Lessons Learned
- Always align your garden design with its most-used viewpoint. In my case, that was the patio.
- Be careful with plastic edging near loose soil — it won’t block grass long-term.
- Measure twice, string once. Shifting the path by a few feet mid-project is no fun.
- Transplanted grass is free — and effective. If you’re tilling anyway, reuse what’s good.
- A center lawn path creates structure — but only if it’s centered.
What’s Next
I’ll keep updating as the roses grow in and the arbor goes up. I’m also thinking about upgrading the lawn edging again — possibly to something more permanent. But for now, the transformation is well underway, and the garden is already more cohesive and inviting.
If you’re considering a similar redesign, I hope this gave you a window into the process — and a few lessons to help you avoid my mistakes.
Would you like a printable checklist for garden layout projects like this?
Let me know — I may put one together for download.